
Dills Tavern: The Garden Shed: Vol 1.4
 I want you to have the best garden possible. For that you need this information.
Regardless of what you are growing April begins our busy season in the garden. The bad news is we have to spend some money to develop a productive garden. The good news is that we don't have to spend the children's inheritance or forego a vacation just to have a good garden. With work and a little expense in the beginning, and gradually building over a few years, you can turn South-central PA's hard packed clay into a very healthy and productive garden.
Most people till their ground and then run to the garden store to buy expensive super-duper soil amendments. You will have to buy some things, but you can produce much of what will be needed yourself with a little effort.
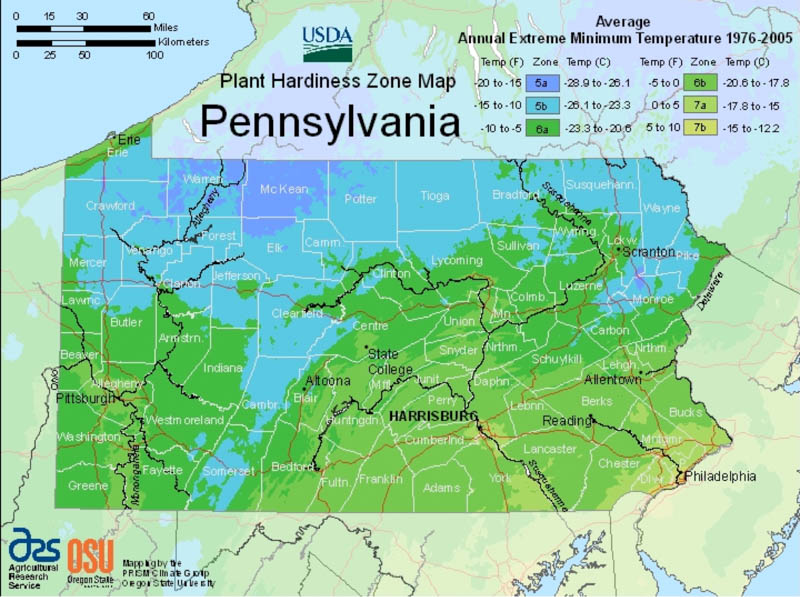
This month we'll cover three topics. The most important, and the longest to discuss, is building healthy soil. Then we need to look at garden tasks to be done in April, and what we can plant in April in our 7a USDA growing zone.
If you sent in your soil samples to Penn State, the test results should be coming back soon. The top half of the first page of the results is a bar graph indicating the soil's pH, as well as the phosphorous, potassium, magnesium, and calcium levels in your soil. Below the bar graph they list recommendations of what to add to your garden to optimally grow the type of plants you indicated to them. The second page gives examples of how to calculate the amounts of amendments needed.Some examples can be a little confusing. Read through them several times, and it will become more clear to you.
Let me say this again. A gardener's primary task is not to grow plants, but to build healthy soil. The soil will grow healthy plants, provided other needs are met, such as proper moisture and an appropriate amount of direct sunlight.
Healthy plants are not as susceptible to attacks by harmful insects. Those insects sense, even before you, that a plant is weak or sick. They indicate that your plant, and ultimately your soil, is not as healthy as it should be. Healthy plants are also less susceptible to harmful soil-borne pathogens and bacteria.
The Most Important Measurement – pH
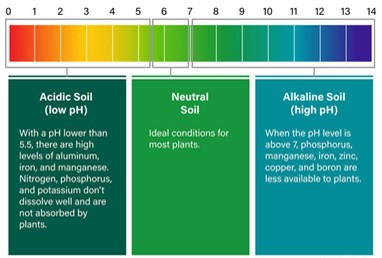
The term “pH” refers to the concentration of hydrogen ions (H) in a particular medium. In our case that is soil. The scale ranges from 0 to 14, with 7.0 being neutral, below 7.0 acidic, and higher than 7.0 is alkaline.
Every plant has a preferred pH range. If the soil's pH is too far out of a plant's preferred range that plant will not absorb the nutrients from the soil it needs for optimum growth. As examples, potatoes prefer a pH range of 5.0-5.5, whereas Azaleas prefer a wider range of 4.8-5.8. Most vegetables, herbs, and flowers prefer a range of 6.5 to 6.8.
Typical South-central PA soil has an acidic pH level around 6.2. Our plants will still grow, but will not be as healthy or productive as we would like. The same is true if someone previously had a garden where you want yours, and dumped a lot of lime onto the soil raising the pH to 7.3 or higher.
On the soil test results Penn State gives examples of how much lime (dolomitic) to add to raise the pH, or how much sulfur to lower it. To raise the pH you can also use wood ash from untreated hardwoods.However, you will need to use 50% more wood ash than lime per square foot of garden, because wood ash is both lighter than lime, and slightly less alkaline. Wood ash also adds carbon to the soil, which absorbs and stores nutrients for plants' later use.
 Alternative Nutrient Sources
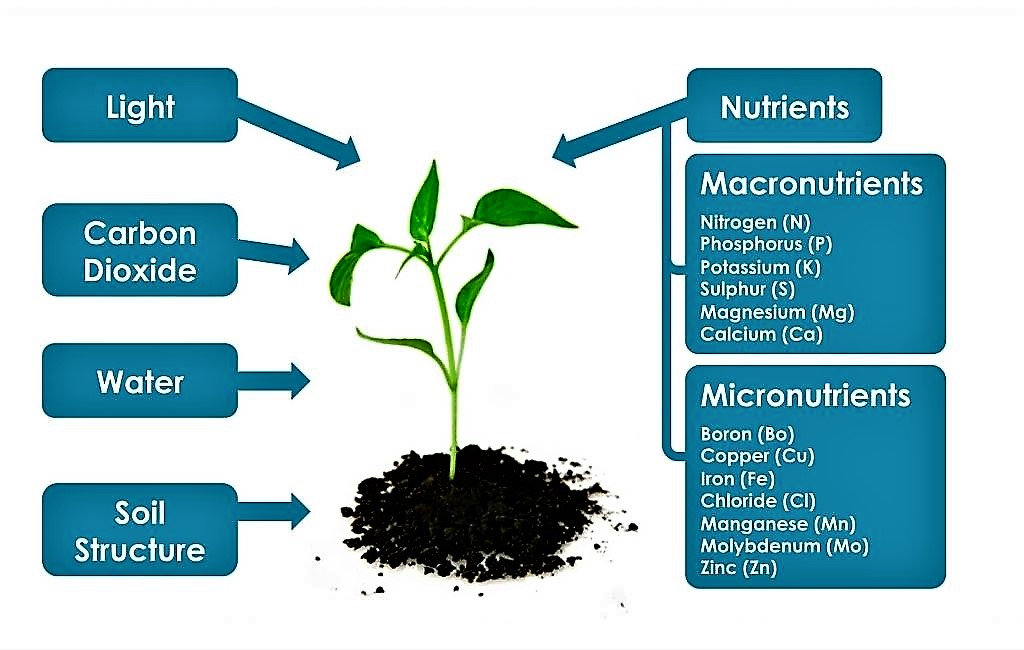 Let's look at nutrients mentioned on the test results. Three major macronutrients, listed on every bag of soil amendments, are nitrogen (N), phosphorous (P), and potassium (K). Two minor macronutrients listed on the soil test results, magnesium (Mg) and calcium (Ca), are also vitally important.
Fertilizers are always listed in the order of [N]itrogen-[P]hosphorous-[K] Potassium.Penn State may recommend a dry form of organic fertilizer rated at 10-10-10. That's 10% of each nitrogen, phosphorous, and potassium. That is okay for the start of the season, or better yet, applying in the autumn and letting it dissolve into the soil over winter. After that initial application it is best to use an organic fertilizer with a 3-1-2 ratio, such as 6-2-4, 12-4-8, 24-8-16, and so on.
Nitrogen (N) is essential for plant growth. It is a key component of chlorophyll, which is necessary for photosynthesis. Chlorophyll also forms amino acids, which are the building blocks of proteins. It helps plants grow strong and healthy. Please note that applying too much nitrogen at once will burn your plants roots and prevent them from taking in nutrients the plant needs.
1. Manures are an excellent source of nitrogen, and provide some phosphorous and potassium. Chicken and cow are the best, but only after they have been composted. For those bunny farmers, rabbit manure can be applied fresh around the base of your plants. Other animals do not digest plant seeds, and will add weed seeds to your garden if they haven't been composted at high temperatures of 160oF or higher.
2. Spent Coffee Grounds can be added directly or in compost as a good source of nitrogen, but they also slightly lower your soil pH.
3. This may sound a bit uncouth, but Human Urine is an excellent source of nitrogen. Dilute it with an equal amount of water, and pour it around the base of your plants.
4. Grass clippings are a fair source of nitrogen, but should be applied to a very shallow depth of about 1/8”. If not pre-mixed with soil or shredded leaves, grass will form a mat like a rain coat that prevents moisture from soaking into the soil. It is best to first compost grass clippings with other compostables such as dried leaves or shredded brown Kraft cardboard.
5. Other nitrogen sources you will have to purchase. Blood meal offers a high nitrogen content. Use it sparingly as it has such a high nitrogen content that too much at one time can burn your roots. Fish emulsion is a good source that provides a quick nitrogen release without being too “hot” for the roots.
6. Cottonseed Meal provides more nitrogen than fish emulsion, but only about half that of blood meal. It provides the nitrogen with a slow, steady release into the soil.
Phosphorous (P) provides secondary minerals and supports nutrient uptake needed for early root growth, plant cell and seed development, fruit and flower development, winter hardiness, and the efficient use of water. It supports photosynthesis and helps manufacture chlorophyll, which gives foliage its green color. Phosphorous is essential for flowers and any plant that produces fruit above the ground (e.g., tomato, pepper, cucumber, squash).
1. As well as nitrogen, Fish Emulsion provides a phosphorus boost to plants with rapid results when sprayed directly on the plants. It works fast but is used up quickly. Apply it every two weeks during a plant's growing season.
2. Bone meal is an organic fertilizer that is ground either fine or coarse from animal bones and animal processing waste. It feeds plants from one to four months, depending on whether it is a fine or coarse grind, respectively. Bone meal contains a high amount of phosphorus at 12 to 24 percent that is immediately available to plants.
Apply bone meal by mixing a tablespoon with the soil in each hole made for a transplant. Also, after planting your seeded areas lightly sprinkle it on the garden surface and water it. For flowers and fruiting plants (mentioned above), every two weeks during that plant's growing season, sprinkle 2 tablespoons in a 9” to 12” circle around the base of the plant and water it in. Bone meal breaks down best in soil with a balanced to slightly acidic soil (pH of 6.5-6.8).
3. Rock phosphate is mined rock with high levels of phosphorus. Its powdered form is used in exactly the same way as bone meal. It is also used in its larger form as a decorative mulch. This is a slow-release form that takes five years to break down completely.
 4. Animal manures, compost, worm castings, and lime will also add phosphorous to the soil. Take care when using lime, however, because it will raise your soil's pH level.
Potassium (K) helps plants with the movement of water and nutrients throughout the plant tissue, and maintains the plant's metabolism. It helps with the exchange of water, oxygen, and carbon dioxide in a plant. The proper level of potassium helps a plant improve drought resistance, increase root growth, reduce wilting from water evaporation, fight disease, and photosynthesize to produce sugars a plant needs for growth.
1. The first option is to add a lot of organic matter to your garden. Organic matter isn’t packed with potassium, but it is a good way to gently adjust your soil over time and improve soil condition. Rich compost and well-rotted manure are two great options.
2. Alfalfa Meal is ground up dried alfalfa plants. It adds a small boost of all macronutrients and many micronutrients. It has a slow release, so is best used at the beginning of the season for a full-season supply.
3. Hardwood ash provides a quick dose of potassium to your garden. Use it sparingly, though, and not at all if your soil is alkaline (pH 7.0 +), because it raises the soil's pH.
4. Potassium Sulfate (aka Sulfate of Potash) is the quickest way to solve a potassium deficiency in your garden. Not all brands of Potash are organic, so make sure to look for organic labels before adding it to your garden. Synthetics starve the microbes in the soil that are essential for healthy soil.
5. Granite dust is a great source for potassium. You can get it from local quarries or garden centers. It's best to apply it in the fall as a slow-release addition of potassium.
Magnesium (Mg) is a key component of chlorophyll, which is necessary for photosynthesis. It also helps activate enzymes and aids in the metabolism of carbohydrates, thereby contributing to overall plant health and growth. Magnesium levels go hand in hand with pH levels. If you raise or lower the pH of your soil that will also raise the lower the magnesium in the soil.
1. Compost releases nutrients into the soil, including magnesium. It also has a nearly neutral pH, so does not affect the soil's pH to any significant degree. There's no need to dig it in. Simply spread one to two inches on top of the soil. Also add a handful to the hole for each transplant.
2. Composted Poultry Manure is a balanced source of magnesium, nitrogen, potassium, as well as other nutrients. Apply it any time during the growing season by working it into the top few inches of soil, preferably to a depth of six inches.
3. Dolomitic Limestone contains 23% calcium and 18% magnesium. It’s also called calcium magnesium carbonate. However, if your soil pH is already at your plants' preferred level or higher do not apply this to your garden. It will quickly raise the soil pH to a level you and your plants don't want.If you must raise the soil pH, though, this is an excellent source for both calcium and magnesium. Use it as a top dressing around plants rather than digging into the soil, because it can compact over time if buried too deeply.
4. Epsom salt is a type of magnesium sulfate with a high concentration of magnesium with sulfur. These two elements are both vital for plant growth. There is not enough sulfur content, though, to change your soil pH. Apply it by mixing one tablespoon per gallon of water. If a large amount is needed, mix it in a clean, large tub. Fill your watering can as needed, and sprinkle it on your garden imitating a light rainfall. The same mixture can be used during the growing season by spraying the plants directly.
Calcium (Ca) helps in the formation of cell walls, supports root development, and aids in nutrient uptake. It also plays a role in activating enzymes and signaling within the plant, contributing to overall health and resilience against stress.
1. Rinsed, dried, and crushed Eggshell will add calcium to your soil, but it takes several years for them to fully break down. A faster way is to make calcium acetate. Place your rinsed, dried, and crushed egg shells in a large glass jar. Slowly pour eight times that amount of vinegar (white or AC) into the jar. A chemical reaction will occur, so you must add the vinegar slowly.
Secure a tight-weave cloth or coffee filter onto the jar. Allow it to sit in a warm place out of sunlight for eight days. Then strain out the shell. Use 1 tablespoon of your newly created calcium acetate per gallon water.For large amounts use the instructions above for Epsom salt under Magnesium. Pour 1/2 cup of the solution around the base of each plant to feed them through their roots. Then put some of your acetate in a spray bottle, and spray all over the plants' leaves, both tops and under sides.
2. You can apply Gypsum to add calcium and improve your soil's structure without affecting the soil's pH. Spread 2-3 handfuls per square yard across your garden. Let the weather, or your next watering, dissolve it into the soil.
3. Bone meal is not only high in phosphorous, but in calcium, as well. Apply it as I mentioned under phosphorous above. Be careful, though, as too much phosphorous can cause a phosphoric toxicity to plants. It's doubtful you will get to that level if you use it moderately, but I needed to warn you. Do all things in moderation.
4. Wood ash from untreated sources contains 20-50% calcium.However, it will raise the pH of your soil almost as much as lime. If you need to both raise pH and add calcium, this is a good choice.
 Tasks For This Month
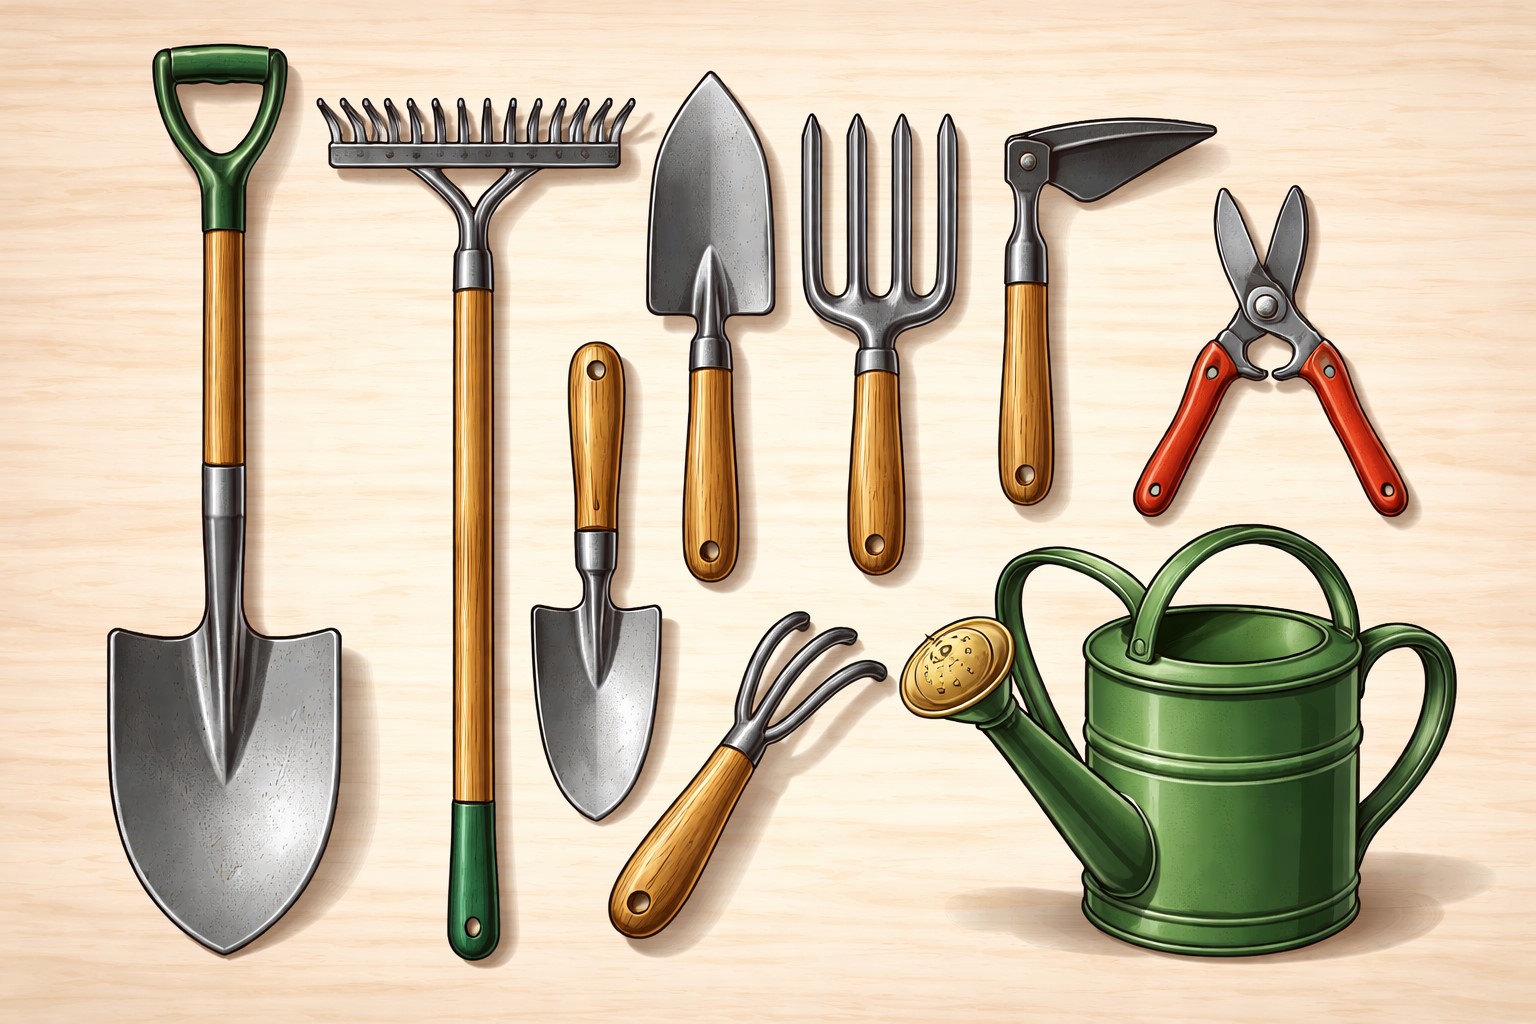
First decide on the tools you are going to need and buy those you don't already have. A shovel, a garden rake, a garden fork, a hand trowel, a 3-pronged hand cultivator, a pair of scissor-type snips, and a 2-gallon watering can are the basics.
Next, clean the dirt from the tools you have, and sterilize them with 3% hydrogen peroxide.
Why not bleach? You can use bleach in a water to bleach ratio of 10:1, but you're going to need peroxide later anyhow for some DIY garden formulae. Also, peroxide will benefit your garden if you spill any on the soil, where bleach may be harmful.
Clean and sterilize any planters you will be using, unless they're permanent and already contain soil. Also clean and sterilize several milk, vinegar, or tea jugs for the DIY formulae you will be making.
Sharpen you shovel and hoe edges. You don't want a knife's edge, Just good enough to easily push into the ground or easily chop off weeds at ground level.
Transplant perennials you want to move elsewhere. It is best to transplant them before or just after they have broken their winter dormancy. Be sure to also get a large amount of their roots. Some plants, like Comfrey and Rhubarb, should have their roots divided every ten years. Digging them now and separating their roots will give you more and healthier plants for the next decade.
Aerate your soil, both in the garden and in planters. Heavy soils especially tend to get water logged and deprived of oxygen. Opening the soil with a garden fork helps evaporate a great deal of that water that would likely cause problems for your earliest season seeds and transplants. Don't turn the soil. Simply push your garden fork into the ground and pull it back and forth to open the soil.
Build or repair your garden's infrastructure, such as fencing, gates, trellises, bed boxes or shaping the beds if you don't use boxes.
What To Plant This Month
If you haven't planted them yet you should plant your peas the first week of April. If you plant them much later they will not fully produce in our region before they start drying out from the summer heat.
During the first two weeks of April we can plant seeds that won't be as affected by cold nights. Carrots, beets, parsnips, radishes, lettuces, bak choi, chard, rutabaga, spinach, turnips, onion and shallot sets, and seeds for leeks and bunching onions.
The third week of April plant your Brassicas transplants (the cabbage family), and plant your seeds for arugula, parsley, and chives,
Remember, once seeds are planted the ground should be kept damp. At this time of the year Mama Nature will probably take care of that, but we have had occasional dry spells in April. How to tell? Pushing your index finger into the ground up to the first knuckle will reveal the dampness of the soil.
Like I said, April is a busy month for gardeners. Don't get stressed out, though. Prioritize your list of garden activities, and then do what you can when you can. Happy Gardening!
~ by Gary Reneker, Garden Master
Volunteers Welcome!
NYCHAPS (especially Gary!) is always looking for volunteers to assist with garden maintenance. Everything from planting, mulching, weeding, and learning/sharing your knowledge with others! Contact Gary Reneker at This email address is being protected from spambots. You need JavaScript enabled to view it.
